
A Game In Clips: Saint Mary's
Utah State MBB played a televised exhibition over the weekend, and that can only mean one thing. It's time for a preposterously in-depth film breakdown, free for all to read. A Game In Clips:
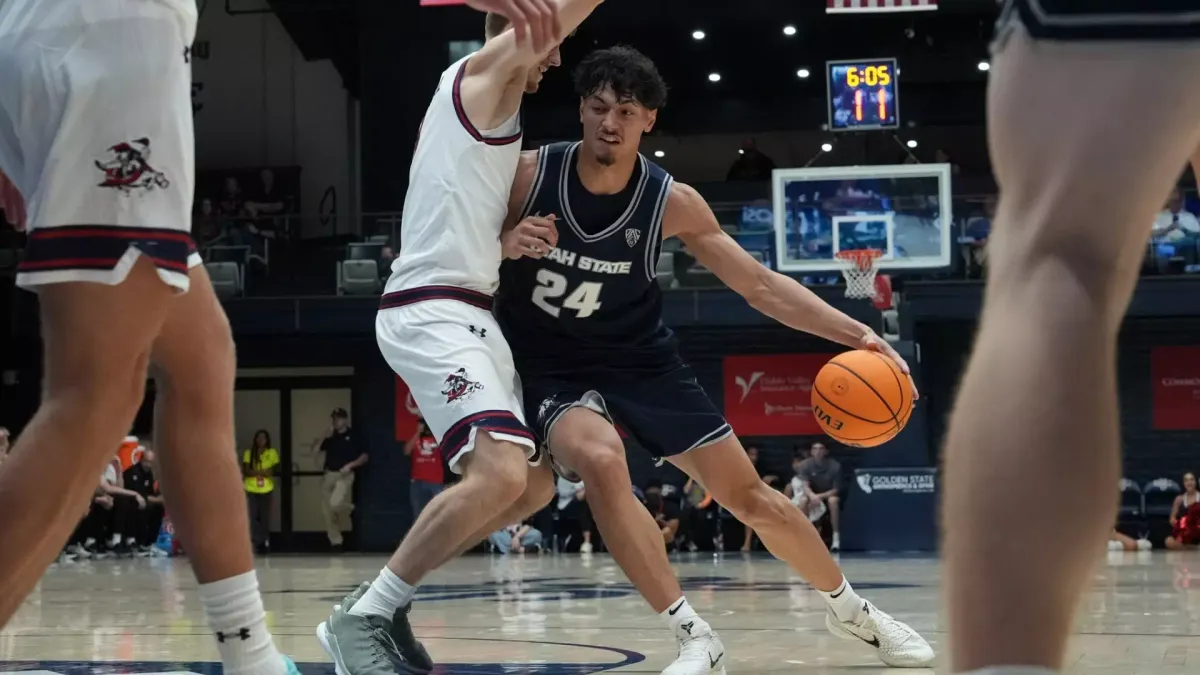
This story is best viewed in your browser.
First, a note on film study stories. It's a form I'm very familiar with for both football and basketball, be it here or elsewhere. I made my first real foray into mid-major football with The Outside Zone, a newsletter dedicated specifically to football film breakdowns.
These are built – at least when I'm writing them – around a few specific strategic concepts of note, with clips culled from multiple games for the sake of a larger sample size and ordered in whatever manner is most narratively convenient. The idea is to identify a trend, explain its origins and function, and then examine it against different approaches from different opponents.
I've written hundreds of those sorts of stories over the years. I've also developed, at some point in the last three or four years, a pretty serious mental block with them. Part of it stems from the sheer amount of time and research it takes to put them together, which rarely fits into my work week during the season, but my bigger issue is with the form itself. Conceptually, it's a rigid, authoritative way to cover an overwhelmingly fluid and ambiguous topic. And practically, it simply no longer makes sense to me.
In the time it takes for me to identify a schematic development, cut film for it and shape it into a cohesive story, there's a pretty good chance the team I'm covering will have already played again, rendering my definitive conclusions useless at worst and outdated at best. I may succeed in explaining the concept, but it comes at the cost of both context and relevance. Schematic changes do not happen in a vacuum, and games are not decided across the span of several weeks. I've failed to factor that into my traditional film study method.
So, rather than continuing to run my head into the wall on these stories, I'm changing them. This new format, tentatively known as "a game in clips," is exactly what it sounds like. I've cut clips for every play I feel to be schematically informative or otherwise interesting from Utah State's 97-89 exhibition win at Gonzaga, and I'm going to break them down to whatever extent is needed, ordered chronologically just like a real basketball game would be. My hope here is to better capture how Ben Jacobson and Utah State's new coaching staff like to do things schematically in sequence, and how that approach changes according to their personnel and their opponent's inputs.
As for the specifics, we're all just going to have to learn as we go, because this is a brand new style for me. I suspect it may ultimately work better in an all-video format, and if so, that's how I'll do it moving forward. Either way, these breakdowns will almost always be reserved for Flaggship-tier subscribers. Well, except this one, which I'm using as a chance to get feedback on the new form, and as a de facto schematic primer for the 2026-27 Aggies.
Because it's the first, and because many of Jacobson's concepts will be new and in need of introduction, this will be much longer than most, so bear with me. It's an exhibition game for everybody, the beat very much included. Let's dive in.
First Half
20:00 - We'll open this up with the first possession of the game, which ended in a Solomon Callaghan double-dribble. I'm not especially interested in the turnover, and I'll be mostly staying away from plays like this in the breakdown, but we do have an important part of Jacobson's offense on display here. Playing twin bigs, Utah State sets up with Karson Templin and Connor Turnbull on the elbows, Callaghan and Kingston Tosi on the low block and Dallin Hall at the top of the key. It's an inverted look intended to pull the opposing bigs away from the paint at the beginning of the set, rather than needing to do it later.
It also works well for one of Jacobson's go-to concepts – a central, playmaking big in the high post. Turnbull takes the ball from Hall this time, reads the defense's reaction to Templin's rotation off a Hall screen, and decides to test the unfortified interior with an entry pass to Callaghan. This could evolve into a backdoor cut for Tosi (which you can see him test before backing off), a kickout to Hall or Turnbull or even a back-to-the-basket scoring effort from the post-up man. That would carry more of a threat with Mason Falslev in that spot, but Utah State didn't have him on Saturday, so this first foray ends with the turnover.
19:45 - Our first look at Utah State's defense ends with another turnover, albeit one actually forced by the defense this time. The Aggies are in man-to-man, Jacobson's standard look, handling Saint Mary's first ball screen with what looks like flat show coverage. It's exactly what it sounds like. The on-ball defender, Callaghan in this case, goes over the screen and trails the ball handler, while the off-ball defender, Templin, keeps himself on a line with the ball and the basket. It's not a full hedge, but he does step out just enough to cut off the ball handler's progress before recovering onto his assignment.
Though not directly involved, the low man is every bit as important to Utah State's screen coverage as the two primary defenders, and that would be Tosi in this case. He's a little late getting back to his man in the corner, hence the quick pass from Joshua Dent to that man, but Utah State's pack line concepts help out here, with Hall in the lane for an easy run-out when Mantas Juzenas loses the ball off his knee.
19:25 - This will be a very common theme, so let's get to it early: Utah State isn't wedded to one particular ball-screen coverage. It has preferences according to its matchups, but variety is crucial for staying a step ahead of the offense, and we get our first look at some variety here. SMC dials up a look that should look pretty familiar to the Aggies, with a big man at the top of the key awaiting an off-ball screen and handoff.
Utah State handles the first screen, an off-ball guard-to-guard down screen, with a switch, then switches again as Darius Bivins orbits Templin's man and takes the ball. The Aggies now have a pair of mismatches to worry about with Templin the perimeter and Hall in the post, but Saint Mary's walks right into a classic Jacobson trap as it moves to ball into the corner.
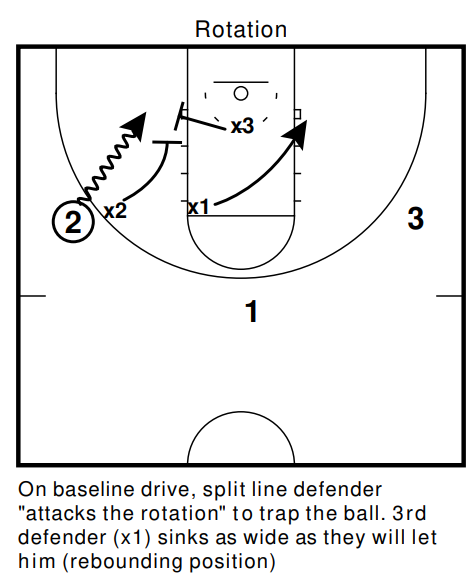
This is an almost identical setup to the one depicted here in Jacobson's 2016 Nike Clinic on "building your man to man defense," with the split line defender (Hall) attacking the ball as soon as Jazz Gardner spins to the baseline. The rest of USU's coverage here is a bit more suspect – Templin probably should be the one to rotate down onto No. 35, leaving Tosi and Callaghan free as close-out defenders – but it's ultimately a moot point, because Turnbull is a bit too handsy and gets whistled for a foul.
18:59 - Almost everything in this sequence is good from Utah State, save for the missed layup at the very end. Turnbull and Templin work very well in tandem to secure this offensive rebound, with Turnbull clearing the path for his battery mate to chase down the loose ball.
Templin resets the possession with a dribble handoff (which I'll just be calling "DHO" from here out) to Callaghan, who reverses play to an open Turnbull after SMC collapses in on his attempted drive. Turnbull also shows a DHO, this time to Hall from the corner, but his is a decoy, setting up an ideal one-on-one situation in the post. He doesn't convert this time, but this is a good shot for the Aggies all the same.
18:42 - There's a lot going on here, but I want to focus in on Utah State's initial ball-screen coverage, scramble shell, and the rebounding work at the end. First things first, SMC starts this off with a double screen, and USU responds with a third coverage look. Hall goes over the first (and Will Hornseth just sticks with the screener) without much issue, but the second one is usually the troublemaker, and the Aggies are ready with a Hall/Templin trap that nearly forces Dent into a backcourt violation. He manages to reset the ball to a big man just in time, and we get our first look at Utah State in a scramble situation.
After Callaghan's initial closeout on Bivins, Utah State shifts into what looks quite a bit like a 2-3 shell, though that may just be a result of SMC's positioning. Either way, the Aggies fared well on their next few closeouts, and Templin walled up nicely for Vangelis Zougris' post-up and hook. I don't love Hornseth's effort on the back side here, but this is another play where Utah State is clearly missing Falslev. This is a much easier rebound for him than it is for Callaghan, who isn't really suited to handle a player like Juzenas on the boards. It doesn't cost the Aggies this time, but it's something to put a pin in for later.
18:03 - About two minutes into the game, we have our first successful offensive set to break down. Utah State starts with a more open version of essentially the same concept it showed on the first play, keeping its off-ball guards low and bringing the dual bigs up to the high post while Hall initiates up top. He again dumps the ball off to his right and cuts left to screen for Templin, but this one has a twist. Rather than orbiting for a potential pass, Templin takes the screen and loops around Hall before cutting into the middle of the paint, creating space for the ensuing Hall/Hornseth pick-and-roll.
With SMC showing level coverage, Hall's job here is to attack the big man and draw him away from Hornseth, creating a pretty simple read in the paint. If Templin's man follows him out to the corner, this is an easy dump-off pass and layup for Hornseth. If not, as in this case, Hall can just keep it himself and win the footrace to the basket.
17:51 - Utah State shows off some full-court pressure for the first time after Hall's three-point play, trapping once before retreating to the half-court. The Aggies will gladly take a turnover if one materializes, but SMC passing the mid-court line almost nine seconds into the shot clock is a victory in itself.
Once in the half-court, Callaghan and Hornseth team up for another flat show ball-screen coverage, albeit in a slightly more aggressive form from Hornseth. Hall handles low-man duties and recovers onto his man with plenty of time to spare, forcing SMC into its next look – a wing DHO into a return pass post-up. Utah State switches it, giving the Gaels what they were after with Tosi in a one-on-one situation with the bigger Zougris, but the baseline trap is again there to help, forcing another reset. Hall's off-ball recovery is great, and he gets rewarded with the ball a few seconds later as Hornseth makes a really nice play on a lackluster entry pass.
17:17 - With a few new Aggies on the floor and no Turnbull or Templin to worry about, Saint Mary's goes right back to the ball screens, starting with another double screen at the top of the key. Utah State answers this one with drop coverage for the first screen and what looks to be level coverage for the second, though the screen is so high that I can't really tell. I'm not sure Tosi could totally tell either, because he's very slow to recover onto his rolling man. The Aggies are a bit fortunate that SMC was already setting up for another screen here, rather than looking for a quick entry to that open roller.
They handle this next one with a hedge that turns into a full-on switch as Gardner, not a shooter, pops to the perimeter while Dent drives baseline. Hornseth's quickness comes in handy to prevent an easy bucket, and Utah State has no trouble resetting as SMC works the ball back around the horn from Dent's corner kickout. Comfortable with Tosi on the ball, the Aggies blitz and switch this next screen before a late switch back when Bivins hits the free-throw line. Three different Aggies nearly make the play on his floated pass to Zougris, but none of them think to box out Gardner, who arrives just in time for the putback.
16:53 - Looking for an answer at the other end, Utah State opens with Hall on the left wing opposite an overloaded right side. Boe cuts across the paint and Hornseth screens for Tosi to rebalance the floor and begin the possession in earnest. SMC is ready for the first action, walling off any potential driving lane and forcing Tosi back to his right, where he swings the ball back up top to Hornseth for a reset.
Hall, recognizing that pass before it happens, breaks into a down screen for Boe, who takes it and runs right into Hornseth's DHO for an easy catch-and-shoot triple. This is a corner zoom action, perhaps the single most important concept in Jacobson's entire offense. It's a lot more versatile than it shows here, but part of versatility is taking what the defense gives you. If the defense wants to duck under two different screens with Boe on the perimeter, there's no real reason for Utah State to explore further options here. That's a shot the Aggies will take every time you give it to them.
16:25 - Still probing at Utah State's defense and looking for answers, Saint Mary's tries screening the screener this time, using Gardner to screen for Dent and Juzenas to screen for Gardner's roll. The Aggies handled this pretty damn well, as best I can tell. Hornseth and Hall answer the first screen with more flat show coverage and Boe does well to recognize the concept and communicate, switching with Hornseth on the fly to account for the rolling Gardner.
Less good is the back-end, where Callaghan and Tosi get a bit confused in passing off their assignments and leave Zougris wide open. He's not a good shooter, so the Aggies can live with it, but that confusion does create the entire sequence of offensive rebounds to follow, with Boe and Hall both facing mismatches on the glass before the former finally gets a clean look to put the possession down for good.
14:21 - Utah State looked pretty gassed on the last few possessions before the under-16 timeout, and decided to keep things simple offensively with that fatigue in mind. It worked out well. The Aggies again open with Hall opposite an overloaded end of the floor, but they keep it overloaded this time to keep potential help defenders away from the basket. A two-on-two PNR rep with Hall and Hornseth is going to work out well for Utah State just about every time, and it's no different here as the veteran point guard draws the defense in and drops the ball off to his big man just in time for an uncontested layup.
14:10 - Fresh legs bring fresh perspective to the game, as AJ Bates and Ace Reiser check in for the first time, joined by Boe, Templin and Turnbull. Utah State shows full-court pressure but backs off, saving its trap for the half-court when Bivins moves the ball to Dent on the wing. Dent handles it well enough to avoid a turnover, but Templin's switch onto Bivins prevents any funny business, and Bates recovers to Templin's now-uncovered man quickly enough to force a reset to the high post.
Saint Mary's wants to attack those mismatches (Templin on Bivins and Bates on Rory Hawke), and does so quite well with an isolation drive and a late cut. That sort of execution usually leads to a bucket, but as usual, execution only goes so far. Sometimes, for example, the other team has Turnbull in the middle, eager to erase well-executed plays with an outstretched right arm. Templin grabs the loose ball, runs the floor, and picks out the best pass available with a dish to Bates in the corner, aided by an excellent same-side cut from Boe to distract Dent.
12:06 - Hornseth really has to be better on the box-out here, but I like everything that happens after the offensive rebound. Hall, Hornseth and Reiser handle a double switch well to cover a screen without leaving obvious mismatches. Bates does good work as the low man, following his assignment to the middle of the floor before passing him off to Tosi, who ends the possession with a freaky play to snatch the cross-court pass.
11:47 - Do you remember what I was saying earlier about the versatility of Utah State's zoom actions? Well, here's a wrinkle. Working the ball to Hornseth with five-out around him, Hall again initiates the down screen to the corner, this time for Tosi to cut around. SMC again goes under that screen and Hornseth's DHO to Tosi, but it is probably right to do so here, because the redshirt freshman hasn't shown much interest in the three-ball. He wants to drive, and he gets just the chance he was looking for when Zouglis switches onto him in the high post. That's too much ground for the big man to cover, and Tosi has no trouble scooting by him for the layup.
10:57 - Another baseline trap, another turnover, and another hard-fought bucket for Tosi at the other end. This may well be the single greatest source of turnovers for Utah State's defense this season, especially when it can use Falslev as one of its go-to split line defenders. He's extremely well suited for this sort of thing, as are Bates, Boe, Hall and Tosi (among others, I'm sure). Basically, if you have long arms and hate in your heart for the ball handler, this is the concept for you.
10:01 - Utah State is working from its zoom action book again here, this time getting things started with Hall orbiting Hornseth to set up Tosi for a wing zoom. SMC is ready this time and Hornseth knows it, holding the ball rather than handing it off as Tosi turns the corner. We get a high-low switch in both corners after that exchange, but the focal point is with Hall and Callaghan in the left corner.
Saint Mary's, having learned its lesson with Boe a few minutes earlier, goes over on this screen to take away the catch-and-shoot chance for a lethal perimeter weapon. So, Callaghan adjusts, feeling the defense and curling into the lane for a cut rather than looping around Hornseth with the defender on his heels. It's a great read and an even better pass from Hornseth, but Callaghan can't quite hang on through the contact from Dent, and the play ends there. I'll ask you to simply imagine this exact situation with Falslev in Callaghan's spot, rather than explaining why a play that ends in a turnover should be viewed as a clear positive.
8:35 - I know I'm missing a decent chunk of the 12-0 Saint Mary's run here, but this isn't really the story for breakdowns of outstanding individual efforts, and that's where most of the run came from – good defense and better offense. It happens. The only part of the sequence I'd take issue with is this play, which is well designed from Saint Mary's and not especially well executed by Utah State.
Much of the trouble here comes from Templin's lax coverage on Zougris and uncertainty about the purpose of Bivins' cut through the middle. Templin stays low through that cut, perhaps expecting Bivins to attack the basket, and arrives late on the scene for the Zougris/Juzenas ball screen up top because of it.
That carries into a softer-than-needed show from Templin, not giving Tosi enough time to get back in front of his man and leaving the Aggies with three defenders (Hall as the low man) accounting for just two Gaels. This might look like a Hall mistake live, but I think he was right to stay in the lane with no one else stepping up to stop Juzenas' progress. It's a no-win situation, and leaving Hawke (a 22.2 percent three-point shooter last year) open in the corner was the right call at the time, even if it didn't work out.
8:19 - Looking for a quick, reliable answer to snap the SMC run, Utah State dials up another overloaded set for an isolated Hall pick-and-roll, this time with Templin. The defense is better here than on the last one, but you cannot leave Templin unaccounted for on the offensive glass. This is a CLASSIC energy guy play. Templin can do it in his sleep.
8:04 - It took about 10 minutes, but we're starting to see Saint Mary's attack some specific weaknesses in Utah State's defense around this point, and the floor-spacing Hawke is again the beneficiary. Knowing that the Aggies will (probably) hedge to cut off the ball handler while bringing a low man to help with the roller, Saint Mary's adds Juzenas into the equation in the perimeter spot previously occupied by Bivins.
He's a safe outlet for the ball handler, and he puts the defense in significant conflict, stationed on the same end of the floor as the helping low man (Boe). This leaves the Aggies with two defenders for three offensive players, at least until Templin recovers onto his man, and gives Saint Mary's a guaranteed open look if it can read the defense quickly enough.
To his credit, Hall absolutely recognizes this from the other end and rotates in as a new low man, but he has about a half-decade of experience on Boe, who doesn't notice the extra help until it's too late. He's caught in no man's land until Templin gets back, and that's plenty of time for Juzenas to swing it to Hawke for another three.
7:35 - It might look different, but this is basically the exact same idea, blown up at the very end by Hall learning from the previous possession's mistake. Saint Mary's is again testing Tosi and Templin in ball screen coverage, using a slower action this time to draw out Utah State's jam coverage (squeezing the screener without a switch). The idea is to get Juzenas downhill, drawing Boe in as the low man and hitting a wide-open Hawke on a baseline cut behind him.
It all works, but Hall is so damn smart away from the ball that it doesn't matter. He again sees where this is headed before anyone else does, and he does not hesitate this time, crashing to the baseline and swatting Hawke's try off the backboard. This is a big part of why Utah State was so keen to bring him in. What a spectacular effort.
7:15 - I don't have much to say about this sideline out-of-bounds play, but I do want to include it for reasons that will become apparent later. For now, it's a corner inbound to Callaghan, good patience for the entry pass, and a trip to the stripe for Turnbull. That'll work.
7:07 - The set up here should look familiar, with Bivins and Gardner running a quick PNR opposite Juzenas on the wing and Hawke in the corner. What's new is Utah State's response.
The Aggies show a harder hedge with Turnbull on the screen and slow-play the low man coverage on the roller, bringing Callaghan in a bit, but not as much as on past plays. This all works to lay an extremely enticing trap for Juzenas, who saw the coverage and jumped to a reasonable conclusion that Utah State was adjusting to focus more on the corner shooters. He was mistaken. The Aggies were waiting for him to make the exact pass he made, and ready to spring Hornseth into the lane as a same-side low man. His timing is perfect, and the steal is right there for him on a silver platter.
5:54 - It was an up-and-down evening for Utah State's frontcourt, but this is one of my favorite possessions of the first half from that group. Saint Mary's uses a fake screen denial off the jump to force Tosi and Hall into a switch, then puts Tosi's lateral movement to the test with a staggered second screen.
Just as there are benefits to isolating a bigger defender onto a guard, there are costs. Saint Mary's pays one here, as the big-bodied battery of Turnbull and Tosi clip a rolling Gardner and send him crashing to the hardwood. That gives the former plenty of time to blitz Bivins and send him off course before returning to his felled man, allowing the rest of the defense to reset as well.
Next, we get a nearly flawless sequence of peel switches. Hornseth, already in the gap, picks Bivins up just as he gets by Tosi, who trails the ball just a bit longer before taking over for Hornseth in the corner. Hornseth doesn't really have a great angle on Bivins either, but he keeps with him long enough for another peel switch, this time from Turnbull, which ends any chance of the drive finishing with points. Utah State does get a little confused at the end, but Gardner is clearly the man to lose track of if you have to lose track of somebody. Just look at that shot. It's not good.
5:20 - Saint Mary's did its share of iterating in this first half, and now it's Utah State's time to do the same. Having no reason to fear Gardner as a pick-and-pop threat, and wholly confident in Turnbull's ability to take away anything within about 10 feet of the basket, Utah State breaks out some drop coverage. It's a higher drop than most, but Turnbull is better at drop coverage than most, so the Aggies can get away with that sort of thing when he's on the floor. Bivins settles for a mid-range stepback, Turnbull bullies Gardner a little more, and Utah State gives Saint Mary's something else to think about on ball screens.
4:54 - Another sideline inbound leads to another post-up, but with a minor twist. With the inbound so close to the corner, the entry pass honors go to Hornseth this time, because he can just go over the defense from any spot behind the arc.
4:09 - The closeout at the end of this play is not Hornseth's finest moment, but the main development to note here is Utah State's ball screen defense. Now the Aggies are switching everything, even away from the ball. We aren't 16 minutes into this game and we've seen anywhere from six to a dozen ball-screen coverage variations from Jacobson and Co., depending on your definition of variation.
3:49 - It seems that we're finding many of Utah State's most schematically notable possessions at important points in the game, when the Aggies could really use a basket. A lot of the scoring I've excluded thus far has been at the stripe, in transition or on individual efforts. I suspect this is no coincidence, but I suppose we'll find out as the game goes on.
Here, trailing by three after Bivins' triple with the under-4 timeout looming, Utah State goes back to the bread and butter, with yet another minor wrinkle added in. This one opens with a Callaghan/Hornseth shuffle cut, which works well enough of its own to make Hall seriously consider a pass to the decoy. He decides against it and moves the ball to Hornseth at the top of the key, then goes about his usual zoom action work for Boe (while Callaghan replaces him in the corner).
Dent, you'll notice, completely leaves this screen alone. He's more concerned about the inside lane Callaghan took last time, and stays in the gap through the interaction. Without him there, Boe can stick with his plan to take the DHO from Hornseth. Luke Fennell was right to go over the screen, but that doesn't mean he can beat Boe to the basket, as becomes apparent quickly. While this is another one of those "built for Falslev" plays, Boe sure seems to be capable in a pinch. That would be a major development in Utah State's somewhat murky wing room.
3:33 - I hesitated to include this one, because I can't possibly break it all down, and the whole sequence is honestly really difficult to track. In about 20 seconds, Utah State hard hedges a ball screen; switches an off-ball slipped screen, then switches again in that corner; uses drop coverage for a ball screen; switches a ball screen; flat shows a ball screen; and finally knocks the ball out of play.
I'm going to guess this was not all intentional, because this is mid-October college basketball and I wasn't born yesterday. Still, it sure does look crazy, and it's a good chance to remember that these guys are learning a lot of stuff in a pretty short period of time. It's a hard job and you take your wins where you can get them.
3:02 - I'd love to have some grand schematic revelation to explain Utah State's 14-1 run to close the first half and take a 44-34 edge into the break, but I don't. The reality is that it was a lot of stuff like this, which is great too, but not for a film story. Some of basketball is play design and the chess match, and a lot of it isn't. Boe decided this possession was going to end with him scoring, and then he did it.
This is a play that portends very well for the youngster from Beaverton. There are plenty of deceptive performances in exhibition games and buy games in the annals of Utah State history. Sometimes, they just get red hot, and it never quite happens again. It's a lot harder to fake an individual play like this one, because most of it has nothing to do with scoring.
Boe manhandles the 6-6, 205-pound Kevin Gad with wonderful technique, knocking him off balance with his first step and keeping him out of the play until the ball hits the rim. He's not first, but he had bumped the one who was first just out of position, creating the deflection and scramble to follow, which Boe also won before outletting to Templin. He grabs another board a couple of seconds later, pirouettes and immediately jumps backward at the rim, twisting to flip the ball up and in. It's not always easy to spot future standouts, but much like Potter Stewart, I know it when I see it. Most players don't do things like this.
2:11, 1:53 - Utah State's version of the pack line defense is not as aggressive as the kind you've grown accustomed to from San Diego State (five top-60 turnover percentage defenses in seven years). I have it here in what I think might be Jacobson's writing, though I can't confirm that, and it doesn't really matter, because it's still about his defense. It comes from here:
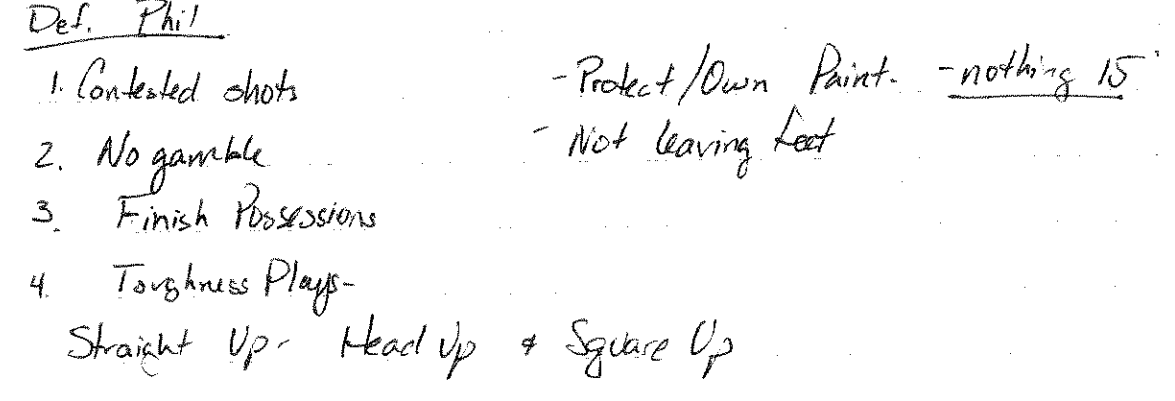
Jacobson had one top 100 turnover percentage defense in his last nine years, and it was last season. His teams are efficient on the break and take advantage of turnovers often, but they don't really hunt them as much as other pack line defenses, because they don't want to risk easy baskets with overly aggressive play in the gaps. When Jacobson teams create turnovers, they usually do it in the passing lanes, in ball-screen coverages, or on the baseline trap.
His stronger turnover defenses have usually been the result of multiple individual turnover hounds making plays – Trey Campbell (3.1 percent steal rate), Tristan Smith (2.5 percent) and Ben Schwieger (2.2 percent) in 2025, and Juwan McCloud (3.3 percent), Jeremy Morgan (2.9 percent) and Spencer Haldeman (2.4 percent) in 2017. Falslev will set the school record for steals this season, probably by a decent margin. Bates has a career 2.3 percent steal rate, Templin's is 2.1 percent, Hall is at 1.9 percent, and that's to say nothing of Boe and Tosi, who combined for four of Utah State's nine first-half steals.
Second Half
19:55 - Utah State took possession to open the latter frame and wasted no time returning to a familiar setup with Hall up top opposite Templin, Turnbull on the elbow as the first playmaker, and two more players in the corners. Templin slips the initial screen from Hall for a quick cut, but Saint Mary's is ready with a counter, bringing back-side pressure to force Turnbull off his spot and into his second read.
That would be a kickout to Callaghan and a quick wing PNR to get him into the middle of the floor, where he can better assess the defense. The assessment is pretty easy this time. Turnbull is open on the roll, but if SMC wants to give Callaghan that much room, he'll take it.
19:41 - I'd wager a guess that Saint Mary's probably talked about ghost screens at halftime as a potential solution for Utah State's ball-screen coverage. There were a few in the first half, but two on one play is a pretty good indicator, especially when it happens to be the first play of a new half. A good blitz from Hall and Turnbull prevents any damage this time, but it's a development to keep an eye on as we move forward.
19:15 - The Aggies were not so fortunate this time. SMC ghosts another Gardner screen to open this one up, forcing Templin to switch onto the big man away from the ball while Turnbull and Hall try to trap Dent. The ball handler wins the race to the corner this time, and Utah State has no one to account for Zougris, Templin's original man now cutting unmarked to the basket for a dump-off pass and quick trip to the stripe.
19:00 - We get another zoom action variation on this trip down the floor for the Aggies, with Hornseth playmaking from the elbow and Hall again initiating the action on a screen for Templin. Templin rides it all the way out this time, orbiting Hornseth and setting a pindown screen in the corner to set up Callaghan for the DHO. Saint Mary's does well on the coverage to force a reset to Hall, and Utah State shifts into "make a play" mode, funneling the ball to Tosi on the low block for the eventual second-chance layup.
18:40 - We're already starting to see Utah State adapt to the SMC ghost screens, and to Turnbull's absence with foul trouble. The Aggies use Hornseth in something between a flat show and high drop coverage for the first screen, switch to gap coverage (where the on-ball defender splits the screener and screen defender) for the second one, then move to a hard hedge for the third, with Hornseth serving as interior insurance. This is really well done from Templin to secure the rebound, too.
17:41 - Utah State dips into some rescreen action this time, overloading away from the ball and isolating Hall and Hornseth for a pick-and-roll, just with a little extra at the start to keep the defense off balance. Once Hornseth sets the screen, Hall picks out the drop coverage makes the right read, splitting the defenders and kicking the ball out to Callaghan, who really needs to just shoot this from the top of the key. It would probably help if he got a bit closer to the arc before the ball came to him, but this is still well within his range, and I'd prefer to see him fire away when he's that open.
17:02 - I'm surprised it took this long, but we have our first baseline out-of-bounds look from the Aggies here, and it's about as simple as could be. A lobbed entry to Tosi at the free throw stripe, a clearout, and a swift drive to the cup for two. It's free real estate.
16:17 - Saint Mary's sets up for a double screen, and Utah State flips the script. Rather than slow-playing the first screen and attacking on the second, the Aggies break out a blitz right away this time, catching Dent totally by surprise with a rare central trap. This is a well-timed and extremely well-executed tendency breaker after a first half filled with wing traps, and it ends in a free possession and two easy points for the Aggies just ahead of the under-16 break – exactly when you want something like this to take advantage of tired legs.
16:02 - There are threes you can live with, and there are threes you cannot live with. This one, coming from a player in Thomas Ndong who has hit all of five triples in nearly 800 minutes of DI basketball, is probably a three you can live with.
15:39 - SMC's guards are clearly getting wise to Utah State's unbalanced PNR sets and doing a much better job of cutting them off and forcing resets early in this second half. How do you respond? Well, what if you reverse the floor, pull all those guards away, and try it with Tosi on the ball against two bigs?
This is what I really like about this format. In a traditional film review, I'd have no cause for including this play or any of the other fairly straightforward PNR looks. Within the chronological context of the game, though, these sorts of plays gain strategic coherence. An individual effort might make it work, but that effort is only made possible by the collection of similar looks earlier in the game shaping the defense into this configuration. Everything builds upon itself.
14:30 - If a concept is working, you keep working it. Utah State overloads opposite the ball and flips the screen for Bates, getting him central and giving Hornseth room to post-up one-on-one. It doesn't end how the Aggies wanted it to this time, but it's another potential avenue, and another thing for Saint Mary's to think about when it comes down the floor next time.
14:16 - That's just how the game goes sometimes. Not every good play ends in a bucket, and not every good coverage ends in a stop. Bates does really well to blow up this first screen-the-screener look with great trail coverage, and Boe has the right idea in covering the second screen for Juzenas. He hurt the Aggies with quick, downhill drives all evening, and Boe wants to force him to his left hand here by icing him away from the incoming screen. Hornseth and Bates are both ready for it too, but Juzenas makes an excellent play and finds a way to score anyway.
14:00 - You've all seen enough of the offense at this point that I shouldn't really need to explain what's going on here beyond the base terminology. This is a corner zoom action for Boe that Hornseth and Bates adjust into a weak-side pick-and-roll after reading the defense's reaction. It's a good read and even better execution on the lob and lay-in. I'd bet you'll see that exact sequence of concepts a lot this season.
13:27 - Two tendency breakers make this one work, first with Hornseth driving into the paint rather than posting up for an eventual DHO, and again with Boe rejecting the screen and driving baseline to eventually draw the foul. As the team gets more comfortable within this offense, they'll be empowered to do more like this, reading the defense and attacking it as they see fit with the various concepts available to them. The more players you have who can improvise within structure, the better your offense will be.
13:14 - Turnbull is back, and so are the blitzed screens. Utah State did a good amount of it with Templin as the primary big, too, but it seems to be most comfortable with Turnbull in that spot. That's rare with a player his size, but if he can handle it athletically (and it sure seems like he can), it's a nightmare for opposing offenses to deal with.
Jacobson's track record with big (at least 6-10), disruptive (block rate at or above three percent) centers is short but strong, with top-60 adjusted defensive efficiency finishes in 2017-18 (60th), 2016-17 (57th), 2009-10 (13th) and 2006-07 (56th) behind Bennett Koch (6-10, 4.5 percent block rate in 16-17, 4.2 percent in 17-18) and Jordan Egleseder (7-1, 5.6 percent block rate in both 06-07 and 09-10). If he can stay on the floor, Turnbull is more disruptive than either one by a pretty wide margin, with a career block rate well above 10 percent.
12:53 - It's another BLOB, and another BLOB lob to get things started with Turnbull on the block. Saint Mary's has seen enough inbounds by now to pack the paint in anticipation, and Utah State uses that to its advantage here, screening Boe's man on the inbound with Bates for a DHO right into a PNR lob and Turnbull dunk. This is simple, beautiful basketball.
12:23 - If Utah State's plan is to deploy Bates and Boe as the bench backcourt, and that certainly seems to be the case right now, it'll be in really good shape. Boe gets things moving nicely with his baseline drive and Bates picks out a good cut, but SMC handles it well and Boe takes the safe reset out to Turnbull. From there, it's just applying concepts on the fly. Templin and Turnbull find their way into a staggered pindown look for Bates, who flies off the screens and buries the triple.
11:44 - Now things are starting to get really tricky on these Aggie BLOBs. The entry lob to Turnbull is standard fare, but everything else here is new, with an extra pass to Bates built to set the table for a backdoor lob to Templin, screened by Hall. Dent has that covered, but he's not ready at all for the counter, as Hall flashes out to the wing for a wide-ass-open catch-and-shoot triple. Turnbull was ready to screen Dent (or Juvenas) if they followed Hall after that screen, but with both distracted by the lob threat, it's not even needed to free this one up. Utah State was really spoiled with Jerrod Calhoun's inbound plays, and though Jacobson's aren't quite so complex, they're pretty damn effective too.
11:31 - I won't spend a ton of time on this one, because there's not much new schematically, but I do want to point out a really nice low man rep from Bates here, picking up the rolling center early and walling off the right side to force a pass (or drive) into heavier traffic. His relative lack of playing time (11 minutes) in this one is one of the few complaints I have. I know Hall is the primary point guard, but Bates is too good to keep on the bench that long, and they don't seem to have any trouble playing together.
10:43 - Unbalanced DHO into a baseline PNR drive for Hall, with good off-ball rotation to set Tosi up for this isolation drive and finish. Good stuff.
10:29 - This is a pretty good example of what I was talking about earlier with Utah State's approach to creating turnovers. The Aggies aren't ever all that aggressive here, but they're quick in executing ball-screen coverages, they keep the ball in front of them, and they occupy gaps well enough to make Saint Mary's think twice about driving. The deeper into a possession you play good, disciplined defense, the more likely you are to benefit from an offensive mistake.
10:08 - Well, well, well, if it isn't a strong-side pick-and-roll. It's been a while. If Bivins stays out of the lane and focuses on Boe in the corner, Hall and Templin can run this as a standard PNR. He doesn't, so Hall rises and kicks it out to Boe, who makes short work of his off-balance defender with a quick baseline drive and help from a nice Templin duck-in.
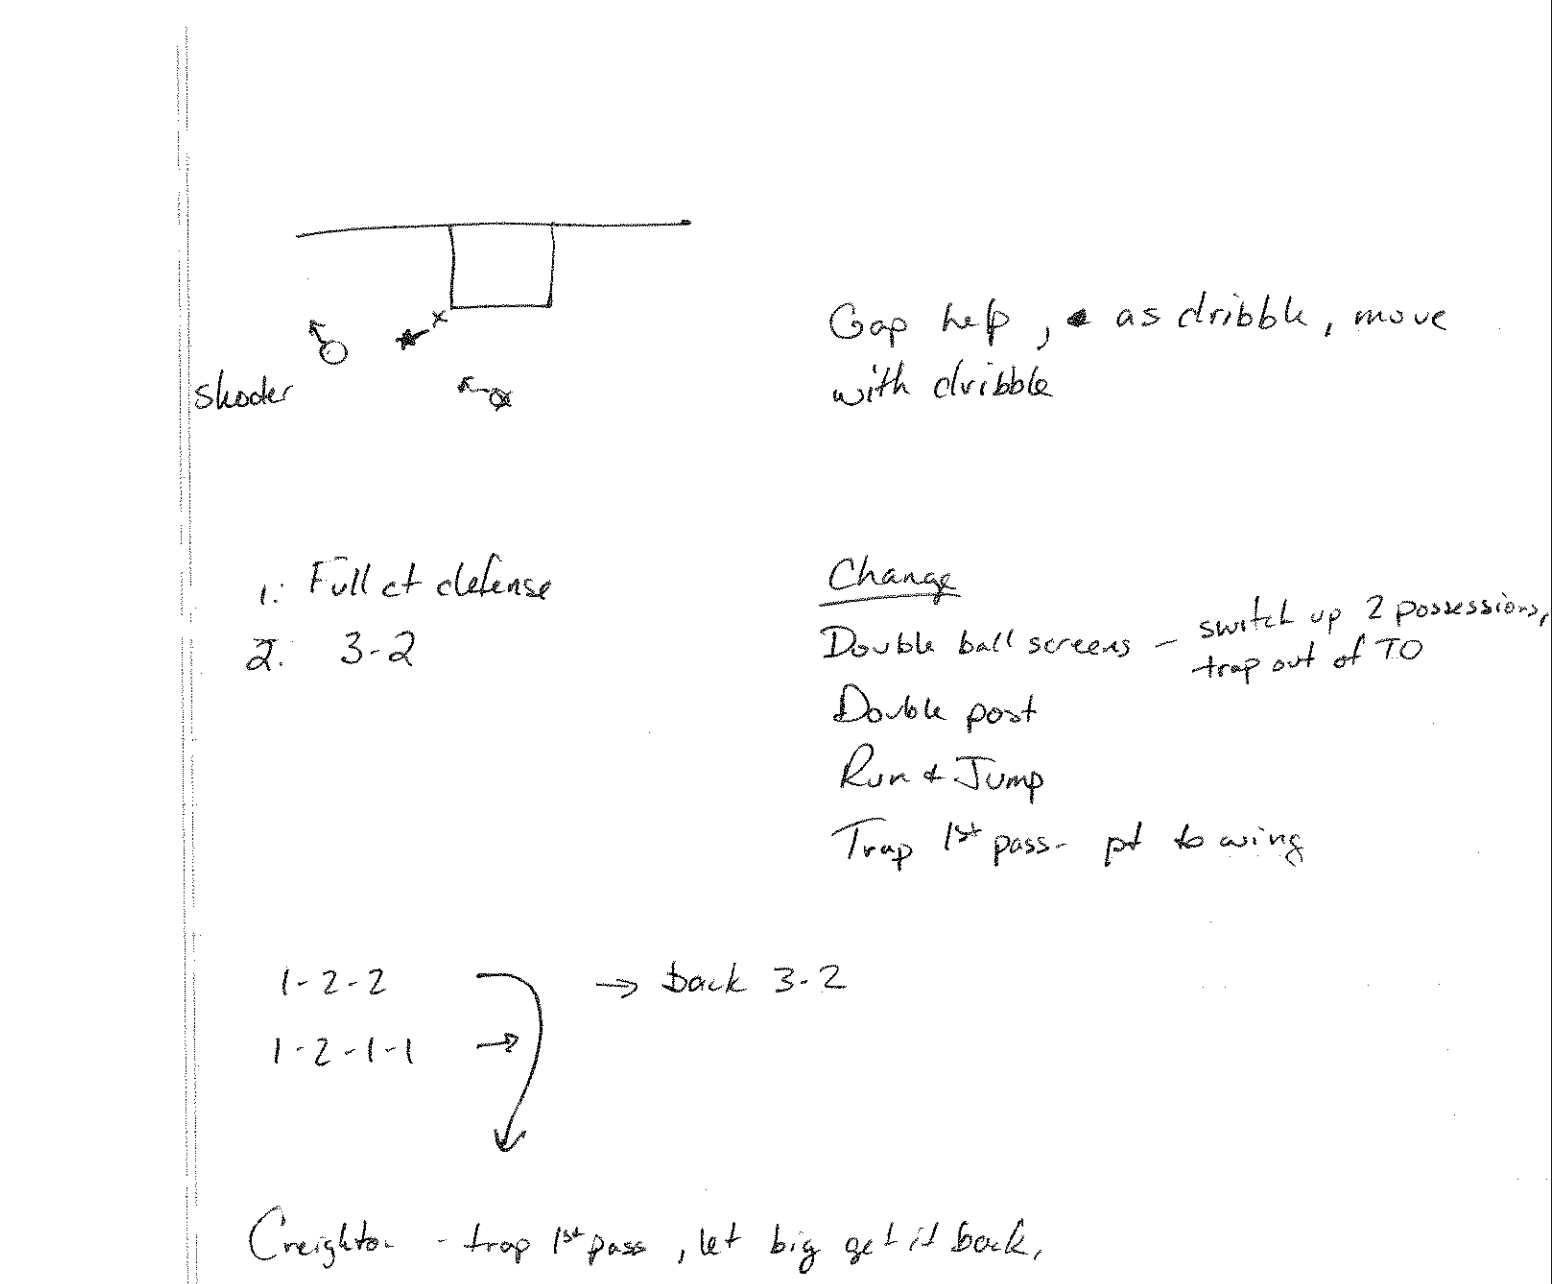
9:53 - This looks a lot like Jacobson's 3-2 shell change-of-pace, with Boe and Tosi holding down the post until SMC gets into a scramble situation, at which point this morphs into a more conventional man-to-man defense. He doesn't do it a ton, but this is one of the weapons in his arsenal, and it can work well to cool off an opponent doing damage with quick reversals of play.
9:38 - Here it is again on the ensuing inbound, with the first screen and Templin's return to the post serving as the signal to snap back into the man look. And here it is in those defensive notes I linked earlier.
7:14 - I might need to send this one along to Stew Morrill to get his ruling, but in my view, I think there's a very real case to be made that this is a variation of Morrill's world-famous "dribble." It looks a little different with the guard exchange (Hall and Boe) happening on the perimeter rather than the baseline, but all the elements are there. You have that exchange, you have a guard (Boe) flashing into the paint before setting a back screen for a bigger teammate (Tosi in this case), and you have the pindown for Boe to then return to the perimeter around. Like meeting an old friend for the first time in years, it might look a little different, but there's no mistaking it. That's dribble.
6:58 - Look, it's an exhibition. There will be some silliness. Hall and Templin blitz the ball screen, but give Bivins a bit too much space to work with, which he uses to pick out the uncovered roller for an easy layup. Whether the low man duties here fall to Callaghan or Tosi is beyond me, but one of them needed to do it, and neither one did. It happens.
6:23 - This is another easier one, though it's a different issue causing it this time, because Callaghan is right where he has to be to pick up the roller. I think the problem here is Utah State holding its double-team on Bivins for too long. Once he turns the corner on Templin to get to the baseline, Hall should probably cut his losses and peel off, either to Tosi's man for a rotation or to the unguarded Juvenas who ultimately knocks down the shot.
5:09 - Utah State gets back on track with this one, using flat show coverage on the ball screen with Hall calling out a switch to take over for Boe as the low man. Boe gets there with plenty of time, Hall darts to the corner as soon as Bivins makes that pass to the top of the key, and Callaghan cleans up on the boards with help from Tosi's boxout.
4:57 - This is a really nice play from Bivins to recognize Boe's impending ice coverage and to beat it before the screen arrives to probe the lane, but Utah State's recovery is even better to keep the Gaels off the board. With Hall staying in the paint as the emergency help defender, Callaghan rotates onto Dent up top, and Boe peels off to replace him in the corner. The reset comes with another ball screen, which Utah State answers with more flat show coverage, and Callaghan shows off some serious defensive chops, first on the ball and then away from it to deflect the attempted Zougris save.
4:23 - You can chalk this one up to poor communication, which I can all but guarantee Jacobson made a note of in Utah State's film study. The initial ball screen coverage with Hall and Templin up top and Tosi as the low man is all fine, but Templin has to call out this backdoor cut to Boe as he's returning to the paint.
4:08 - Templin's… unique crossover not withstanding, there's a lot of neat stuff here. Much of Utah State's zoom action work in this game came with the focal point on just one end of the floor, but the Aggies break out a double pindown look here, with Callaghan curling around Boe (and seemingly looking to set another screen for him to pop back out) on one end, while Hall ghosts a screen for Tosi on the other end. Templin decides to go with the latter, reversing course for a DHO to Tosi, which he takes to the cup for a tough layup.
3:28 - This is one of my favorites. We have some wing zoom action for Boe to get it started, but with Saint Mary's in gap coverage, there's not much for him to do but serve as a decoy into the second action. That's a corner zoom for Tosi, who takes the DHO and rejects the screen, allowing Templin to slip it and roll for a quick entry pass. He can't quite handle it cleanly, but Utah State finds a way to make it work as Callaghan makes the backdoor cut into wide-open space. His instinct to pump fake here is right, too, but he can't quite finish it off. Still, you'll take this possession 10 times out of 10, and probably get eight or nine buckets from it.
2:39 - No worries, as he makes up for it about a minute later with a lovely isolation drive off another corner zoom action. This isn't a look you want him taking a ton, but it's not really built for him anyway (this is another Falslev play), and it's a nice boost that he can do it every now and then.
1:36 - There's no schematic value here, and really, we've hit the point of the game when everything is pretty much on the table. You know what they have, they know what you have, and it's up to players making plays to decide the game. Saint Mary's presses, Reiser and Bates get the ball out of dangerous, Boe makes a big-time play on the baseline, and Sean Felts finishes it off. Dagger.
1:09 - And finally, we come to the end of this extremely long breakdown, with yet another player making a play. The honor goes to Bates this time, who sniffs out this backdoor cut without needing to look and makes a great play on the ball to put the game to bed for good.


